The 3-pass ffmpeg pipeline behind every VideoCue render
A walk through the render container: image-to-clip with Ken Burns motion, concat with crossfades, overlay-plus-audio-plus-watermark. And why we shell out to Python from Laravel.
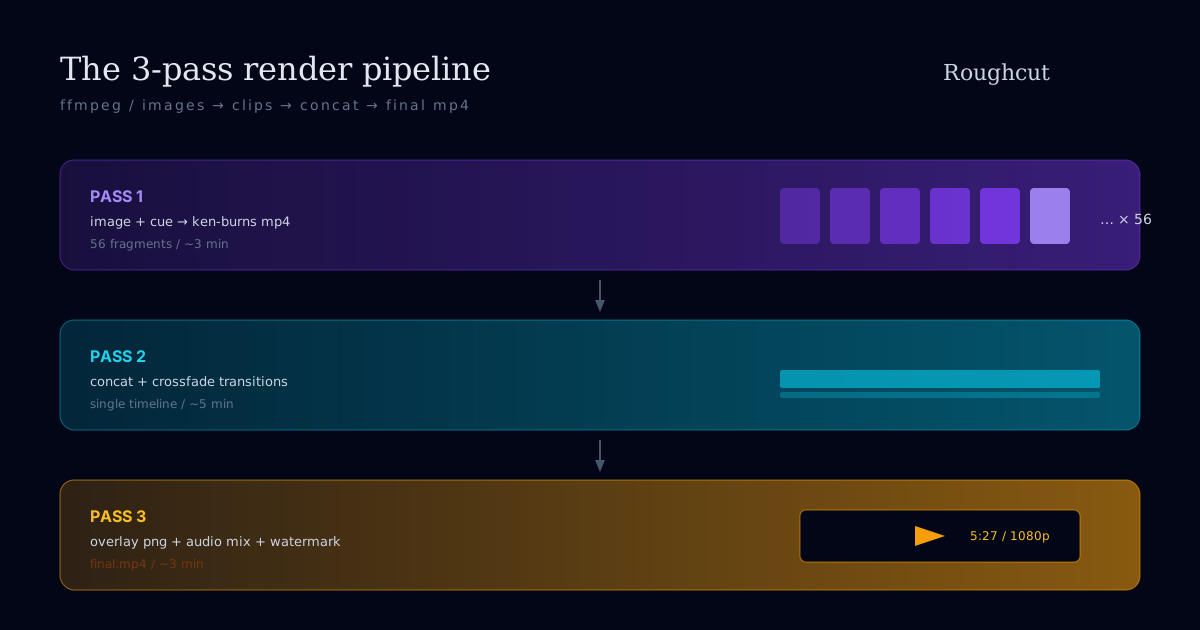
Every video that comes out of VideoCue is built by the same three-pass ffmpeg pipeline. This post is for the developers and the curious - what each pass actually does, why we structured it this way, and the architectural call to shell out to Python from Laravel rather than do everything in PHP.
The shape of the pipeline
Three passes. They are sequential within a render job, parallelisable across jobs.
┌──── PASS 1 ──────────────────────────────────┐
│  per-cue image → ken-burns mp4 fragment       │
│  output: 56 fragments (for the coffee video)  │
└───────────────────┬───────────────────────────┘
                    ▼
┌──── PASS 2 ──────────────────────────────────┐
│  concat fragments + crossfade at boundaries   │
│  output: 1 silent video stream                │
└───────────────────┬───────────────────────────┘
                    ▼
┌──── PASS 3 ──────────────────────────────────┐
│  overlay PNGs + voice + music + watermark     │
│  output: final.mp4                            │
└───────────────────────────────────────────────┘
Each pass is a single ffmpeg invocation (sometimes with a filter graph that does a lot). No GUI tooling, no NLE in the loop.
Pass 1 - image to motion clip
Each cue in the script has an image and a duration. Pass 1 turns each image into a Ken-Burns motion clip of exactly that duration.
A simplified pseudo-command for one cue:
ffmpeg -y -loop 1 -i image_007.png -t 4.20 -filter_complex "
  [0:v]scale=2400:1260,
  zoompan=z='1+0.0009*on':x='iw/2-(iw/zoom/2)':y='ih/2-(ih/zoom/2)':
    d=101:s=1920x1080:fps=24,
  format=yuv420p
" -c:v libx264 -preset veryfast -crf 22 frag_007.mp4
The zoompan filter is doing the work. We start at 100% zoom, push toward 109% by the end, framed around the center of the image. The motion is intentionally slow - under 1% scale change per second - because anything faster reads as a music-video stinger and breaks the contemplative register.
We vary the Ken-Burns direction per cue (zoom in, zoom out, pan left, pan right) using a small heuristic: alternate direction every cue, never repeat the same motion twice in a row, bias toward zoom-in on close-up subjects and pan on wide shots.
Pass 1 for the coffee video produces 56 fragments (some images are split across multiple cues), at roughly 3 seconds of wall time per fragment on a single worker. Total: ~3 minutes.
Pass 2 - concat with crossfades
Pass 2 stitches the 56 fragments into a single video stream. The filter graph uses xfade between adjacent fragments at cue boundaries:
ffmpeg -y \
  -i frag_001.mp4 -i frag_002.mp4 -i frag_003.mp4 ... \
  -filter_complex "
    [0:v][1:v]xfade=transition=fade:duration=0.4:offset=3.8[v01];
    [v01][2:v]xfade=transition=fade:duration=0.4:offset=7.2[v02];
    ... continued for 56 inputs ...
  " \
  -map "[v55]" -c:v libx264 -preset medium -crf 20 -an concat.mp4
A few details that matter:
- Crossfade duration: 400ms at cue boundaries, 200ms at act boundaries (the larger ones), and 0ms (hard cut) on the one beat we want to land hard - the first-sip moment at 4:18 in the coffee video.
- No audio in pass 2. We add audio in pass 3 because the mix needs to align to the final video clock, not an intermediate one.
-preset mediumfor the concat, slower than pass 1'sveryfast, because this is the only pass that encodes the full 1080p stream end-to-end and we want quality.
Pass 2 for the coffee video runs about 5 minutes on a 4-vCPU worker. It is the slowest pass.
Pass 3 - overlays, audio, watermark
Pass 3 takes the silent concat output and adds everything else:
ffmpeg -y \
  -i concat.mp4 -i voice.wav -i music.wav -i watermark.png -i lower_third.png \
  -filter_complex "
    [0:v][3:v]overlay=W-w-32:H-h-32:enable='not(between(t,0,0.6))'[wm];
    [wm][4:v]overlay=64:H-h-64:enable='between(t,0,8)'[ov];
    [1:a]aformat=fltp:48000:stereo[vo];
    [2:a]aformat=fltp:48000:stereo,
      sidechaincompress=threshold=0.05:ratio=8:attack=20:release=400[music_ducked];
    [vo][music_ducked]amix=inputs=2:duration=longest:weights='1 0.6'[aout]
  " \
  -map "[ov]" -map "[aout]" \
  -c:v libx264 -preset slow -crf 18 -c:a aac -b:a 192k -ar 48000 \
  final.mp4
What is happening:
- Watermark overlay in the bottom-right, suppressed for the first 600ms so it doesn't pop in.
- Lower-third overlay in the bottom-left for the first 8 seconds (title plate).
- Voice + music mix with side-chain compression so the music ducks when the voice is active. The
sidechaincompressfilter is the only reason the mix sounds clean without manual automation. - Final encode at
-preset slow -crf 18- quality over speed because this is the master.
Pass 3 wall time on the coffee video: ~3 minutes.
Why Python, not PHP
Laravel owns the world above the pipeline:
- The user-facing render job is a Laravel queued job.
- Project state, render attempts, retries, billing, asset storage - all Laravel.
- WebSocket progress events back to the browser - Laravel + Reverb.
But the pipeline itself shells out to a Python worker pool. Three reasons:
1. ffmpeg-python is better than the PHP equivalents. ffmpeg-python is a thin, well-maintained wrapper that lets you build filter graphs as Python expressions instead of string concatenation. The PHP options (PHP-FFMpeg, hand-rolled proc_open) require either escaping a 4KB filter string or accepting an API that does not cover modern filters. The Python version is mature, tested, and we never have to debug shell quoting.
2. Probing and analysis is cheap in Python. Between passes we call ffprobe, parse JSON, sometimes pull frames with pyav to measure mean luma for the watermark visibility check. PyAV and numpy make these checks fast and ergonomic. PHP makes them painful.
3. The render worker is a different scaling unit. Render is CPU-bound; Laravel's HTTP/queue workers are I/O-bound. Co-locating them on the same process means the slowest render starves the fastest API call. Splitting Python out lets us scale render workers horizontally on dedicated machines and keep the Laravel app server lean.
The handoff is a simple JSON contract over a queue. Laravel writes a render spec to disk, enqueues a job, the Python worker picks it up, runs the three passes, writes status and the final MP4 to S3, and notifies Laravel via a webhook. Failure modes are explicit; retries are owned by Laravel.
Why three passes, not one
You can technically express the whole thing as one ffmpeg invocation with a monstrous filter graph. We tried.
Three reasons it is worth splitting:
Debuggability. When pass 2 produces a flicker at the boundary between fragments 23 and 24, we have the actual fragments on disk to inspect. A monolithic filter graph leaves you with one bad MP4 and no good way to bisect.
Cacheability. Pass 1 outputs (frag_NNN.mp4) can be cached across re-renders. If the user changes the music but keeps the script and images, pass 3 reruns on the existing concat output. This cuts the cost of a music-only iteration by ~80%.
Parallelism. Pass 1's 56 fragments are independent - we run them in a parallel pool of 4 ffmpeg processes inside the worker. Going monolithic forfeits this parallelism.
The downside is wall-clock overhead from re-decoding between passes. We measured this at ~6% extra time vs. a monolithic graph. Worth it for the upside.
Where this can break
A short list of real failure modes from production:
zoompanclipping at fragment edges if the zoom rate is set too aggressively. We clamp at 1% per second.xfademismatched pix_fmt if a fragment was encoded with a differentformatfilter. Solved by forcingyuv420pon every fragment.sidechaincompresssilence on the duck when the voice has long pauses - the music doesn't recover fast enough. We useattack=20:release=400to balance the duck speed with the recovery.- Audio drift at 60+ minute lengths. Solved by setting
-async 1on the final encode and re-clocking the audio to the video at the start of pass 3.
Architectural pattern, not a one-off
This same pattern - Laravel orchestrates, Python does the media work - is how we run the image generation pool, the voice synthesis chunking, and the YouTube upload step. PHP at the edge, Python at the workhorse, JSON over a queue between them. It is boring in the right ways.
What to read next
- Anatomy of a 5-minute AI narrative: "Your Life as One Coffee Bean" - see this pipeline produce the reference render.
- Pricing AI video honestly: what each minute costs - including the render compute cost.
- From script to upload in under an hour: a creator's workflow - what this pipeline feels like from the editor side.
If you want to call the same pipeline from your own product, the API is on Creator and Studio plans.